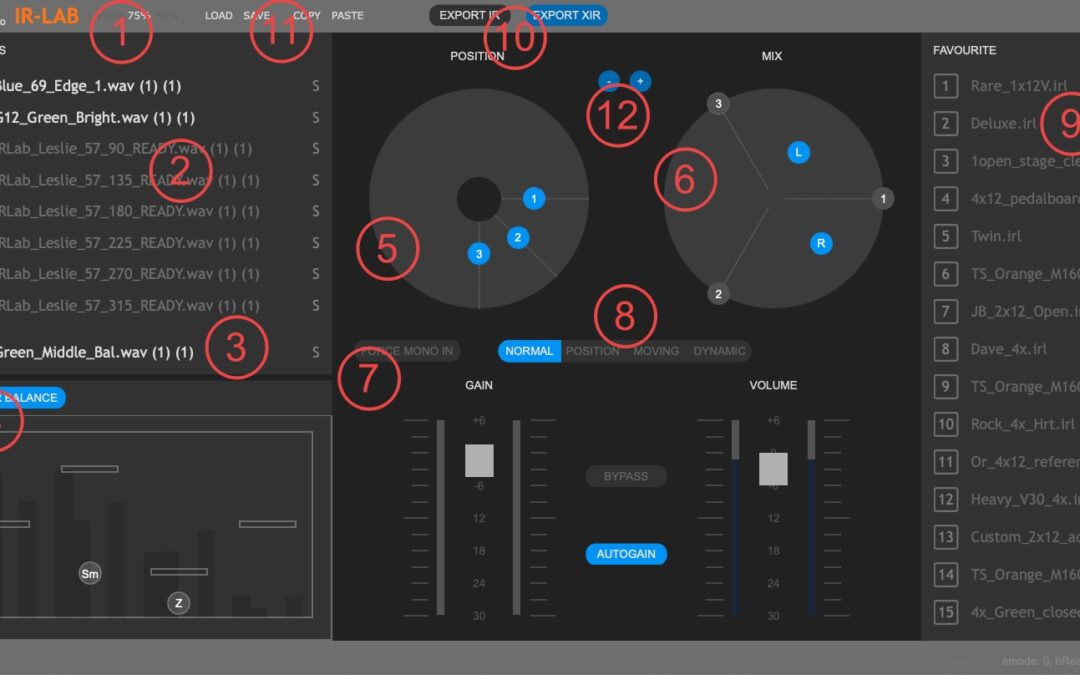
Interface.
- Size of the interface.
- Click to load a model (IR or XIR).
- Click to load a reference model (IR or XIR).
- Master Balance area. Four vertical faders: boost or cut average level for that frequency range. Four sets of vertical bands on the background: levels for loaded models (included reference, last on the right in each set, if loaded). These work on loaded IRs ONLY. Sm: Smooth the frequency spectrum of each loaded IR (NOT XIR). Z: set the impedance of the cabinet as seen from the amplifier (affects the overall sound of the plugin, including XIR models).
- Position handles. Set the position of the microphone on the raw. Works on multi-position XIRs only.
- Mix area. Set the listening position in relationship of the loaded models. If on the circumference, it mixes only the two models around the handle. If inside the circle, it mixes all the loaded models, in relationship to the distances. Shift-click on the handle to toggle mono-stereo.
- When engaged, stereo input channels are mixed to mono at the input of the plugin.
- Working mode. Use “Normal” for normal use of the models.
- Favourite presets area. We often go back to the same subset of available models. The presets saved into /Users/Shared/SKnote/IRLab/preset/favourite/ are always readily available here. Click on a name to load the preset.
- Export functions. Export the resulting model as a XIR (includes levels and positions, if defined. In Normal mode: slots are used as levels. In Position mode: slots are used as positions.) or as an Impulse Response (being implemented).
- Load, Save, Copy (through system clipboard) and Paste current preset. NOT to be confused with managing models (XIRs or IRs).
- Increment/decrement the number of active models.
Overall concept.
– IR-Lab loads your IRs and translates them into physical models of cabinets. With “translating” we mean that a physical model is self-tuned to have the loaded IR as its average (time and level) response. Made short: sounds like the original IR but is dynamic.
– Up to eight slots are available. You can load an IR in each slot, each one is translated into a physical model (we called this process “Sublymation”, with that ‘y’ there). Once loaded, the slots are mixed together by the mixing area on the right. In mono mode, left and right positions are the same (mono result). By shift-clicking on the position handle, it is split into Left and Right positions, that can be set individually for stereo effect.
– Loaded slots can be merged into a single file (we called the format “XIR”, with a “.xir” extension). You can choose if the slots represent working levels of the cabs or positions of the microphone. Example n1: I have three IRs that come from sampling a cabinet at three different working levels (mic in fixed position). I can merge them in a “Level” XIR. Example n.2: I have three IRs for three different positions of the mic in front of the same cab, same test level. I merge them in a “Position” XIR.
– Slots can contain not only IRs but also XIRs. The position area (center) lets us set the position of the mic for each XIR (if contains positions). The working level of the preset lets us span the Levels inside the XIR (if contains levels).
– Level XIRs can be combined into Position XIRs, so obtaining the most complete XIR: Position x Level.
Such a XIR is loaded in IR-Lab (or elsewhere, you’ll see) and responds to levels with both model’s dynamics and XIR’s Level-dependent behaviour, also we set mic’s position by the position handle.
Several old IRs corresponding to the same cab and mic can be merged into a XIR to make the workflow a lot simpler, thanks to the seamless morphing.
Now, things can get complicated, if we like (or not, if we just want to make music and ignore the following).
IR-Lab can span slots (seamlessly morphing) driven by periodic movement (rotation) or level.
Example1: load front and rear IRs for the same cab in slots 1 and 2. Set IR-Lab from “Normal” to “Moving” mode. Set rotation speed by the small knob on the right. The sound periodically and seamlessly morphs between the two models. Set the general size by the other small knob on the right: a delay related to positions is added to Left and Right channels (one of the main effects of rotation is relative phase movement, not just timbre). Mix some dry signal in and you go crazy with huge sounds. Once selected, the list of IRs can be merged in a single XIR for future use.
Example 2: Load three IRs from three versions of the same cab tracking, corresponding to three tracking levels. Set Dynamic mode and let the incoming level control the morphing. “Speed” sets the sensitivity, now. Merge into a XIR.
You can also go creative and combine IRs that are not strictly related to theory or even to the same situation.
About the workflow.
A list of fifteen presets is always readily available on the right. While producing, we are probably always going back to some well tested, pre-cooked sounds. You set the list by putting a copy of the preset in the “favourite” directory. Click on a preset, get it loaded.
Slots can be solo’d. Why not muted? Because by muting one we’d mess with the whole mixing situation, so doesn’t make so much sense. Example: I’m using three slots, I’ve set the mixing position on the right, then I mute one slot. How are the positions defined now that the cabs are just two? So, Solo only. It is quick and simple, to get reference to one of the slots.
A 9th slot is available: it is for reference. It can be listened only by soloing it, for quick comparisons. Its frequency levels also appear on the Master Balance area (see below).
The Master Balance. We chose not to include a full-featured EQ here. My personal idea is that if you have to really modify an IR, probably it is not interesting. Here, you just have four frequency bands, instead. Lows. low-mids, high-mids, highs. Content is visible in the four sub-areas. Four controls let us boost or cut the section, for the overall sound. Three slots used? affects the three models (and, so, the final sound). Do you really want to re-balance a single IR? Load it alone, balance, re-save. We really needed to keep this simple.
Master Balance area also contains two round handles (controls). First one on the left is an overall IR smoothing. You want smoother valleys and peaks on the spectrum? Increase Smooth value. The second one is the impedance as seen from the amplifier out to the cabinet. This matching affects the frequency response (and dynamics). Move the Z control to change the impedance of the cab as seen by the amplifier. As a rule of thumb: 0 is single speaker open-back, 50% is 4×12, beyond 50% is really heavy effect.
Suggested startup.
– Load two IRs you know in two slots.
– Set number of active models to two by the +/- buttons (center, top).
– Engage AutoGain.
– Move the morphing handle (right big circle) to somewhere.
– While sounding going through, increase input gain. Then decrease. Compare how the sound is affected by level (still on a single, plain IR).