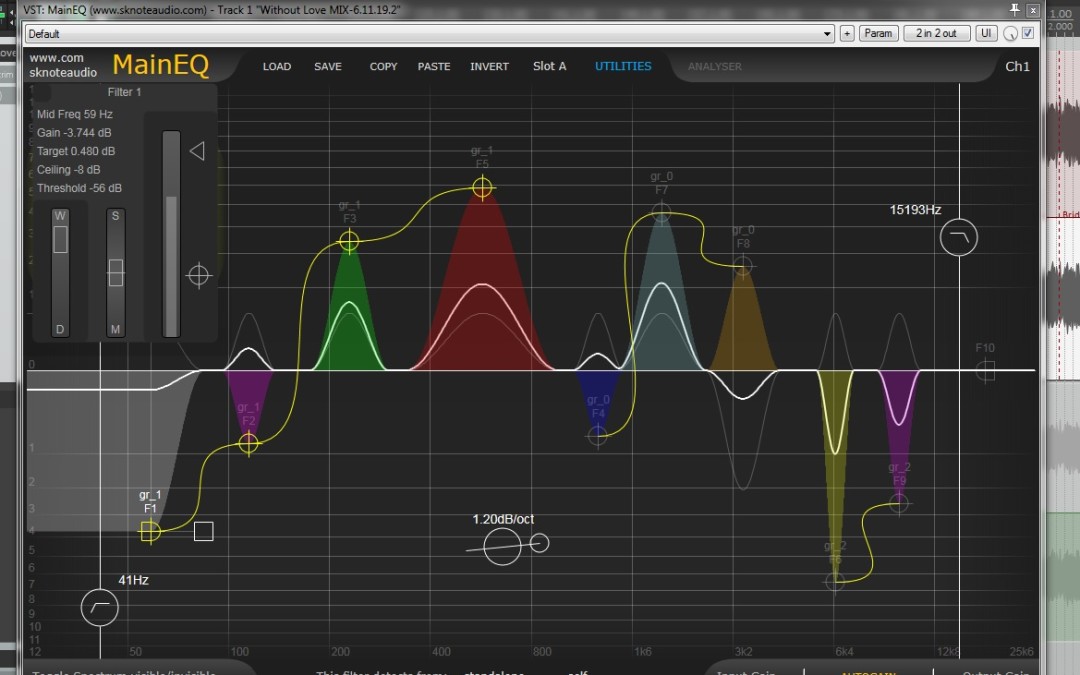
MainEQ is built around a main set of filters:
- 1 resonant Low-Shelf filter.
- 1 resonant High-Shelf filter.
- 8 parametric peaking filters.
It also includes some auxiliary filters:
- High-Pass filter.
- Low-Pass filter.
- Tilt filter.
Frequency and gain for each main filter is set by dragging its handle on the interface. The floating filter’s window shows detailed information.
Clicking on a filter’s handle sets it to current and its parameters are shown in the floating window.
Double-clicking on the active filter’s handle toggles it on/off.
The bandwidth of each filter is set by horizontally dragging the bandwidth handle (a square). The handle is automatically moved to the right or left part of the filter, depending on filter’s position on the screen, to get room for it. You can also use the mouse-wheel while the pointer is on filter’s placeholder to change filter’s bandwidth. Hold Shift for finer control.
Double-clicking on the bandwidth handle toggles filter’s filtering action on/off (because the filters is also a detector, see below. Only the detector remains active when the filtering action is off).
Main filters are optionally set to dynamic. by double-clicking on the target handle (a triangle) sets the filter to dynamic mode. When in dynamic mode, an additional section appears in the floating window, with detector’s output, threshold and ceiling controls.
In dynamic mode, a filter can receive its controlling signal from its own detector (like in normal dynamic filters), from another filter’s detector in the same window or from the overall level coming from another instance (generally inserted in another track). Two additional options for a filter’s controlling signal are: internal overall signal level and everything (whole incoming signal) but filter’s band. Two menus in the middle of the window’s lower bar let us pick the source for the controlling signal (instance and, if internal, e.g. from the same instance, filter).
Filters get a different color if they are driven by another filter (green) or by another instance (red).
No matter the controlling signal’s source, a dynamic filter’s behavior is easily set by two couples of controls:
- Base gain (main filter’s handle) and target gain (triangle handle, which should be on for dynamic mode).
- Corresponding handles aalong the detector’s level meter in the floating window (circle+cross and triangle).
When detector’s level trespasses the circle+cross handle (threshold), filter’s gain starts moving away from the base gain to its target gain (triangle on the screen). As soon as detector’s level reaches the target beside the detector’s meter (triangle), filter’s gain reaches its target (triangle on the screen),
Main filters can be grouped in “Polys”. A Poly is a set of filters that can be moved as one.
To group filters in a Poly, select the first filter, then, while holding Ctrl key, click on further ones. A yellow curve will show the connection. To remove a filter from a Poly, hold Ctrl and click on it again.
To move a poly on the screen, simply drag the handle of one of the filters. Target gains (triangles) don’t change. Gain is increased or decreased the same for each filter, no matter its sign (they all go up or down).
When you move filters together, a few doubts arise: what if a filter has positive gain (boost) and the other one in the same Poly has a negative value (cut)? So we added some options.
To adjust absolute values of the gains (e.g. a filter with positive gain is moved up, filters in the Poly with negative gains go down) hold Shift.
To have target gains following the change (keep the base <-> target gain distance untouched) hold the Alt key.
You can also hold both Shift and Alt keys together to get both behaviours at the same time.
The floating window contains two more controls (vertical sliders):
- Wet/Dry crossfade (this is a GLOBAL control).
- Mid/Side crossfade (this is for the active filter).
Wet/Dry is actually a global control on all the main filter’s gain at once. Wet corresponds to all the filters having the gain you see on the screen. Moving the slider towards Dry means that all the gains are progressively scaled to 0 dB. So, having the slider to Dry is the same as setting all the gains to 0 dB. Any intermediate position corresponds to a fraction of the overall action. You can think of it like a crossfade between a track and a parallel copy with the EQ on it but without all the phase issues.
For a very powerful use of the Wet/Dry slider, set the EQ to your liking, then try to get a more transparent result by moving the Wet/Dry slider a bit towards Dry to reduce the action.
Mid/Side is a specific (acts on the single filter) control on how much the filter affects the Mid and the Side components of the signal. THe center position is neutral, it is a normal filter. When moving towards Mid, it affects the side less and less. When moving towards Side, it affects the Mid less and less. This is an extremely powerful control on the processing, for example try to set a strong EQ curve and then move the control to side to keep back the focus on the Mid component (which, when moving the control towards Side, gets affected less and less).
High-Pass and Low-Pass filters are extremely smooth filters, added to get control on the frequency range of the signal. They are set to 6 dB/oct. To engage a filter, double-click on the handle. When active, its cross frequency is shown beside the handle. To set the frequency, move the filter on the screen. Handle’s vertical position doesn’t affect the filter, it is only available to put it in the most comfortable position.
The Tilt filter is an overall filter centered around about 800 Hz as its pivot point. To engage it, double-click on its positioning handle (the bigger circle). When engaged, its slope is shown beside the handle. To change the slope, drag its setting handle (the smaller circle) vertically. Tilt filter’s position on the screen doen’t affect its behaviour.
The Spectrum Analyser is a two channels, log frequency scale analyser. The source is independently selectable for each channel. Click on the “Analyser” label to engage it.
Channel one offers two options: input or output signal.
Channel two offers more options: output or the signal coming from another instance.
Depending on the selections for the two channels, controls for some functions can become visible for the spectrum. These are automatic EQ settings, which set the complete set of main filters to get an overall response as close as possible to the target. These are the available targets:
- Flatten. This is available when analyser’s channels are set to input and output, respectively. Pressing the button sets the EQ to compensate for the overall incopming frequency response and get the output spectrum as close to a straight horizontal line as possible.
- Match. This is available when analyser’s channels are set to output and another instance, respectively. Pressing the button sets the EQ to make the output spectrum as close as possible as the spectrum coming from the other instance.
- Carve. The same as the previous one but the EQ is set to get a spectrum complimentary to the external one.
Note that the results are normalised, meaning that the overall EQ settings are computed around an average value (to get an average null added gain).
What are the starting points for these three funtions? They are the max levels for the bands. Using these functions when some meaningful levels aren’t stored gives useless results.
To test them:
- Double-click somewhere in a free area of the screen (resets levels).
- Check that analyser’s channels are set right (e.g. output and a different channel).
- Press play and let some meaningful range of the song play. See the max levels being set.
- Press stop, then press e.g. “Match”.
Note that all previous setting for the main filters are lost, as these functions use all the 10 main filters.
Also note that this is not intended for exact matching (detailed peaks and valleys, notches, etc.) but for overall balancing while mixing or mastering.
Presets are managed through a versatile and powerful yet simple system.
A single plain-text format (“meq” extension) is used for internal (clipboard) and external (save to disc) storage.
Load and Save buttons let us manage presets on disc through the classic system’s window. Saved files can be open in a text-editor (temporarily change the extension to “txt” if you want to explore this) and all the parameters are shown with their names in plain text.
Copy and Paste are done through system’s clipboard. This is extremely powerful because you can copy from an instance and paste to another one on-the-fly. The Invert button is extremely useful for this, e.g. set the EQ on a track, copy, paste onto another instance, press Invert to get two complimentary settings for tracks competing in the mix.
Copy and Paste is useful for quick preset sharing in forums, too. Simply copy, then paste in a post as plain text. Another user can copy from the post and paste in one instance.
MainEQ contains foyur Preset Slots. Each slot contains a whole preset. They can be extremely useful for quick comparisons. You can use Copy/Paste to get quick copies from one slot to another one:
- Select a slot.
- Press “Copy”.
- Select a different slot.
- Press “Paste”.
Utilities menu contains both functions and some useful templates.
Undo/Redo is on a single level and is useful when you use a “big” function (like, for example, Match) and yyou want your previous settings back.
“All filters stronger or weaker gain” utilities are quite useful to scale the overall action of the EQ for fine tuning. While the Wet/Dry slider (see above) scales internal action of the filters (and can only reduce the gain), these utilities actually change parameters’ values (and can act as both increase and decrease).
Input and Output gain (bottom-right corner) have different functions.
Input gain is internally compensated for (you cannot hear any level change), so it actually acts as a “sensitivity” control. It is very useful once you have set a complex dynamic filter and want to fine tune its action. Changing the input gain affects the general response.
Output gain is a simple static gain and is useful to set the average output level to match the input signal’s level (so that dry and processed signal have approximately the same level, for fair comparisons).
Autogain is an extremely powerful feature. It is a true autogain that compares input and output levels and automatically and smoothly sets the output gain to match input and output levels. Extremely simple, just keep it engaged while changing the settings for your EQ and see it gradually set the output gain.