Digital audio is often said to be too clear, sterile, almost. While this may definitely have its advantages and make life easier in quite a few ways, many people still miss the warmth and musical imperfections of analog recordings. Luckily we can re-create these effects in just about any DAW, and one way to do so is to use a tape machine plugin. Roundtone is such a plugin, and it provides you with pretty much every functionality that you would expect, like tape speed, wow and flutter, and more.
In this episode, we’re going to use Roundtone to give a techno tune some sweet old school flavor – so let’s get into it!
Here’s our example track:
While the music as such surely has that kind of retro feel to it, the production is fairly flat. There’re also some nasty high frequencies, especially on the synth sound – good thing, this is something that we can fix with a tape emulation as well!
Round and round
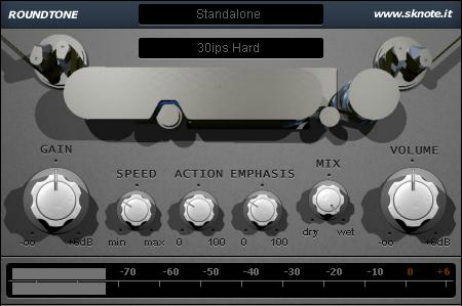
Since we wish to affect the whole mix we insert an instance of Roundtone on the master bus. With its several controls the interface may seem a little intimidating to newcomers at first, but once you know how to use which feature it is actually very straightforward – don’t worry, we’ll talk you through everything in detail!
- Main options: Here you can choose between different modes that will affect the overall functionality of the plugin. Since we use only one instance of Roundtone we stay with STANDALONE.
- Algorithms: This determines the general sound/behavior. You can select from a whole lot of options here, from different tape speed values to dynamics and more. ‘ips’ means ‘inches per second’ – the higher the value the faster the virtual tape is going to move. Higher values also mean higher fidelity, i.e. a clearer sound. We choose 30 ips Hard. This will give us a high quality result while also fattening up the sound a bit.
- Gain: This knob determines the overall strength or depth of the effect. Note that raising the gain won’t increase the volume. We bring it up to about five o’clock.
- Speed: This is the second speed option, which controls the overall time constants for the tape machine. For we already chose a 30 ips setting, we keep this rather low.
- Action: Here you can dial in the coloration amount that is being applied to the signal. We don’t want to overdo it so we stay at roughly ten o’clock.
- Emphasis: By increasing the emphasis-value we can bring some of the higher frequencies back in that may have gone lost in the process. It also adds some dynamic coloration. A high setting will give us a nice and clear sound.
- Mix & Volume: These the usual controls that you would find in most other plugins, too.
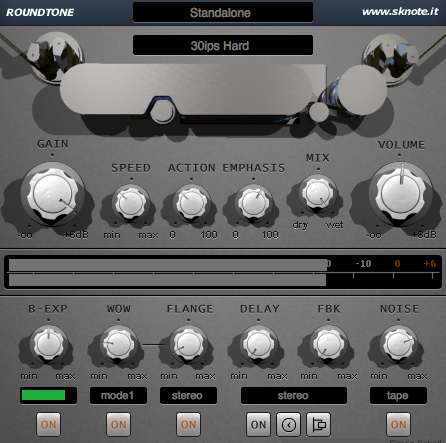
- B-Exp: Turn this up to add more life (i.e. dynamics) to the signal. We choose the middle position so that we get a little bit of a bouncy vibe. Be sure to turn this effect on by clicking the corresponding button below.
- Wow: As we indicated at the beginning, tape isn’t as perfectly reliable (or static) as digital data. It’s literally moving all the time, thereby causing inevitable movements in the sound as well. In order to get that authentic analog feel we turn this up a bit, and of course activate it with a click at the button below.
- Flange: Similar to a conventional flanger effect this unit adds a fairly drastic ‘woosh’-effect to the signal. Therefore we stick with a very low setting, because we just want some subtle movement here. Don’t forget to switch it on, as well.
- Delay: Almost a full blown tape delay in its own right. We leave it off for now.
- Noise: All right, we know what you might be thinking: Why would someone deliberately add noise to an audio signal, even more when the plugin is on the master bus?! Well, too much noise is certainly not what we want. However, if you listen to (more or less) old songs and recordings, you might notice this slight hiss, which is barely noticeable in the mix, but becomes actually apparent if it’s gone. A small amount of noise can bring some of the aforementioned imperfection of yesteryear’s music to your computer. It’s best to choose the amount of NOISE according to the style of music you’re making. A single piano melody for example might not need as much of that extra as a rock or techno song, like in our case. We set it to about two o’clock. As said earlier, don’t expect to hear it right away – that’s just not the purpose here. And, as before, we switch it on to become active.
Well, that was quite a bit of work – but we’re sure it will be worth it! The interface of the plugin should now look something like this:
The Result
Here’s our techno track with Roundtone engaged:
As you can tell, the changes are pretty drastic – the song gained a lot more weight and has really been glued together, thanks to the tape saturation and dynamic effects. We also, er, rounded off the edges so that the high frequencies don’t jump out as bad as before. Yet it doesn’t sound static or dull at all!
You can download the preset for Roundtone here: Roundtone Oldschool Techno Preset.FXP