In this tutorial we’ll try to turn a dull and boring mix into something more musical and natural. Let’s have a listen to the initial example first before we start working on it:
As you can hear, the levels of the independent instruments are fine, however there are literally no dynamics at all – everything sounds flat, lifeless. Usually we should avoid or address issues like these right during the production process, but since we only have the final mix to work with we will have to deal with them in retrospect. So, let’s get going!
The Upper Section
We open an instance of Disto and place it onto the audio track. For we will only work in stereo mode we can simply ignore the controls in the middle and the lower right of the interface and concentrate on the upper section for now. Here we’re going to dial in the compression amount as well as some initial saturation. We don’t want to go completely crazy, but only apply enough compression to achieve the desired effect.
The first thing we do is to set up the HP2 high pass filter for the sidechain, which keeps the low frequencies out of the compression circuit, resulting in a more consistent and clean sound. Next we set up a ratio of 10:1 to get a good grip on the dynamics without completely squashing them, aiming for an average gain reduction of 6-8 dB. Please note: Depending on the volume of your source material you may need to adjust the input level with the Gain-control in the upper left corner of the plugin in order to achieve the desired amount of compression!
The Attack and Release controls are crucial, because they determine how much ‘motion’ there will be in the end. We choose a long Attack to preserve the transients of the drums, and a fairly short Release. This will actually result in a little bit of pumping, but in a very musical and pleasing way – as you will soon hear for yourself!
Finally, we activate DIST3 together with the HP high pass filter in the Drive section on the right, to introduce some sweet saturation and harmonics without messing up the bass frequencies.
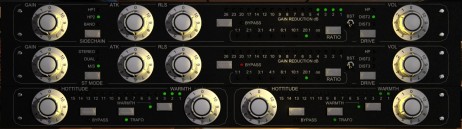
The upper section of the interface should now look something like this:

The Lower Section
Now let’s move on to the lower section to adjust Hottitude and Warmth. A little goes a long way here, especially regarding the Hottitude-control – even a value just below 1 will give the sound a nice boost without audible distortion. Meanwhile, Warmth is more forgiving. We activate it by clicking the corresponding button (an orange LED indicates that it’s on), and choose a value of 5-6 to give the mix a more organic feel.
The lower section of the interface should now look something like this:

The Result
Now let’s listen to the final sound example with Disto engaged:
Not only does it sound bolder and warmer, but due to the compression we applied with Disto the mix eventually comes to life and has a nice motion to it.
You can download the preset for Disto here: Disto – Breathing Mix Preset
If you are using Disto V2, please download the preset here: DistoV2_Breathing_Mix.FXP