Please note: In order to hear all of the following stereo processing correctly make sure to use headphones or (studio) monitors.
There are plenty ways to expand or enhance the stereo image of an audio signal. And there are plenty tools that provide you with one of those techniques. And then there’s ThreeD which incorporates several of them in one plugin, giving you the opportunity to always choose that very process that works best for your demands. In this tutorial, we will have a look (and a listen, of course) at ThreeD’s algorithms so that you can get a good understanding of how it actually works.
In order to make things easy comprehensible we start off with a mono recording of a guitar, which doesn’t contain any stereo information at all, that is:
Broaden the horizons
As indicated above, we’re working on a mono track in our DAW of choice. Therefore, we place ThreeD as a Mono to Stereo effect onto it. On the other hand, it is of course possible to use the plugin on a track which already is stereo; in that case the stereo image could be enhanced as well.
All right, let’s take a closer look at the different modes (with the prefix M -> S as in our case):
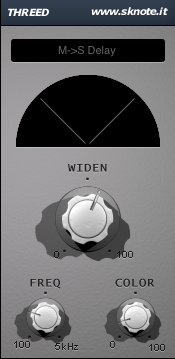
- Delay: This method involves a delayed signal, which is then played in parallel to the original one. Both signals are then panned right and left to create the impression of a stereo signal. In this mode, the WIDEN knob controls the amount of delay. In other words, the higher the value the more width will you get, but the delay becomes more obvious as well – that’s why we choose a position only at about one o’clock. The FREQ knob determines the threshold above which the signal will be processed. It’s often a good idea to keep the lower frequencies in the center (mono) to preserve energy and definition in the low-end. We set it at around ten o’clock. The COLOR knob acts a little bit like an EQ: the higher the position, the clearer the sound. Although this can be useful in some cases, a lower value also has its advantages, because the result sounds more organic or natural – that’s what we go for.
The Interface of this instance should now look something like this:
And here’s the guitar with this mode engaged:
- Spread 1: This mode spreads the frequency spectrum in the stereo field. It resembles a bit of a chorus effect and is generally less noticeable than the delay. Hence, we turn the WIDEN knob a little higher than in the previous example. We then set the FREQ fairly low and the COLOR knob somewhat higher.
The Interface of this instance should now look something like this:

And here’s the guitar with this mode engaged:
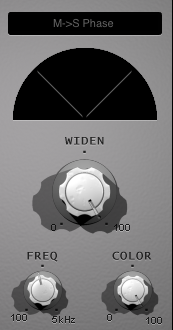
- Phase: This mode adds a second signal to the original one with a different phase. Both signals are then panned to the sides. The FREQ control is crucial in this mode, because we may get some volume shifts from left to right when it’s set a specific position – which is obviously not what we would want. We therefore play around with this knob to find the position that works best with the source material. Although we cranked the WIDEN control all the way up the Phase mode remains one of the subtle ones in ThreeD.
In our case, the Interface of this instance now looks something like this:
And here’s the guitar with this mode engaged:
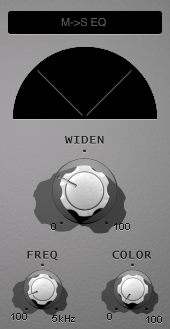
- EQ: In this mode the source signal is split up into two frequency bands (high and low), which are then panned left and right. In fact, this doesn’t create a (pseudo) stereo effect as such, but rather introduces subtle variations between left and right. Because of this the result sounds like it would have been actually recorded in stereo – regardless of the fact that we’re working with a mono sound! The FREQ and WIDEN controls are most important here: set them to a position where both channels, left and right, are at the same volume level and don’t lose anything of their energy.
In our case, the Interface of this instance now looks something like this:
And here’s the guitar with this mode engaged:
- Pan above & Pan below: These modes add pan modulations to the upper and lower frequencies respectively. Unless you don’t want to end up with a tremolo-esque effect (which, of course, can be interesting in its own right), you should go for lower COLOR values here – because this control determines the speed of the modulation going on. According to the mode you choose, higher or lower FREQ settings might work best.
For the Pan above mode the Interface could now look something like this:
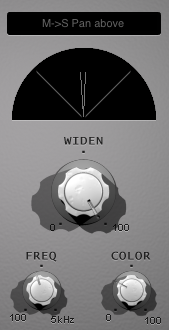
And here’s the guitar with this mode engaged:
For the Pan below mode the Interface could now look something like this:
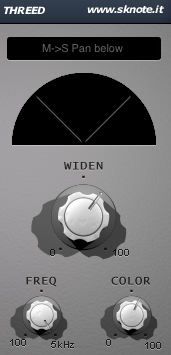
And here’s the guitar with this mode engaged:
- Ambient: This one could well become your all-time favorite. Thanks to a rather complex process, which involves delays with distinct phases, as well as amplitude and cross-correlation variations between left and right, this mode creates a very broad stereo width while still sounding very musical and natural. The most important control here is the COLOR knob, for it determines how much of a decay (i.e. width) the plugin will cause. When working with full mixes you can well choose higher values, because it wouldn’t be so obvious anyways. However, when you’re dealing with a single instrument – like the guitar in our example – you might want to keep the knob as low as possible to avoid an artificial sounding tail.
Hence, the interface of this last instance could look something like this:
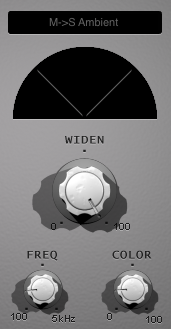
And here’s the sample track with this mode engaged:
You’ve now seen quite a couple demonstrations of how ThreeD can be used. Yet, as always, there’s nothing wrong with experimenting! Just be aware of the changing functionalities of the controls in the diverse modes, and make sure to adjust everything accordingly to the source material you’re using.
As a starting point, you can download all of the bespoken presets for ThreeD here: ThreeD_Space_Exploration_Presets