Disto-S is a simple and powerful version of Disto, and includes the new algorithm and an extremely powerful autogain feature for automated level matching (matches output level to input level, see a separate post for details).
Disto-S emulates a Distressor hardware unit by Empirical Labs. It adds a few features to make its use easier thanks to the digital world.
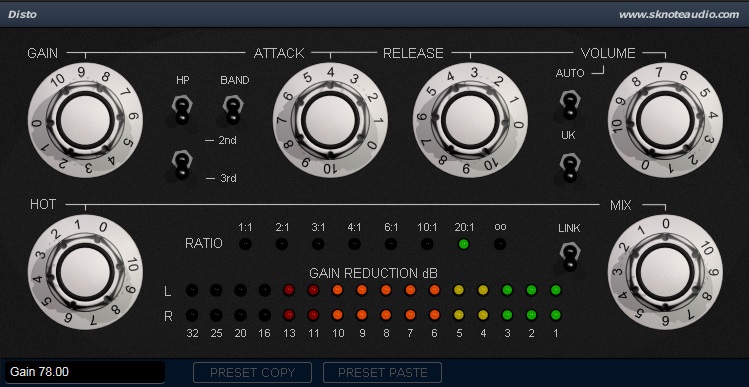
Controls.
- Gain. An input gain control. Ranges from -20 to +20 dB gain. Neutral position is 5. Use this to control how the input signal hits the compression stage. It is a clean gain stage so you don’t have to worry about the original level of the input signal.
- Attack and Release. These two knobs control two time constants used in the compression section. They are “times” (as opposed to “speeds”) so the higher the slower. Their actual value depend on the active Ratio mode (see below). Set a slower attack to let more peaks pass through and get more snap, faster to get more control and remove attack peaks. Set a slower release to get a cleaner sound or faster to get more sustain (when well tuned to the natural decay of the input signal).
- Volume. An output gain control. Ranges from -20 to +20 dB. It can be automatically controlled by the Autogain feature, when engaged.
- Hot (Hottitude). Controls the headroom available after the compression stage. Let it in its default state for the original headroom. Decrease for a cleaner signal (and probably more headroom and dynamics), increase for less headroom, more controlled peaks, up to distortion.
- Dry-Mix. It is a phase-aligned mix of an amount of dry signal to processed signal. Expresses the amount of dry signal added, so zero means normal compression (no dry signal added). Keep it at zero for normal compression. Use this one instead of external parallel compression where possible.
- HP and Band. These two switches engage two filters in the internal sidechain path. HP reduces compressor’s sensitivity to the very low frequency range (from 80 Hz up). Use it to let more low frequencies pass through where needed. Band increases compressor’s sensitivity to mid frequency range (around 5 kHz). It is useful on blatant sources, vocals, a lot of snare drums, etc.
- 2nd-3rd. Select the polarisation of the saturation after the compression. While in 2nd mode the saturation is less symmetrical, with all orders of harmonics. While in 3rd mode the saturation is more symmetrical, with more odd harmonics than even harmonics.
- UK. This switch engages the “British Mode”. Originally designed to get the hardware unit to emulate a vintage unit and o be used in 1:1 Ratio mode, it actually multiplies the options of the whole device by two. Engage it for stronger effects.
- Link. Useful only on stereo sources. When engaged, this switch links the sidechains for the two channels (Left and Right) to get a common control signal which then controls both channels’ gain reduction. This option preserves the original stereo image. Use Link mode when you need to keep the stereo image intact. Disable Link when you don’t need to keep the original stereo image and want more added width and movement.
- Auto (AutoGain). Activates the autogain feature. See the specific post for details.
- Ratio LEDs. Directly click on a LED to select the relevant compression ratio mode. Values are only indicative and involve a much more complex model. Try them all to get an idea of their character and get used to them for their best uses.
NOTE: Switches are active when the handle is close to the label. E.g. HP is active when the handle is up.