Compression? Yes. Expansion? Definitely. Equalization and transient manipulation? Double check. Saturation? You bet. In short: Grasso is really a powerhouse when it comes to shaping the dynamics of an audio signal and giving it a nice, analog feel.
In this episode, we will use this great plugin to process and shape the sound of some really heavy metal drums. We want them to be as clear and punchy as it can get, and thanks to Grasso’s rich feature set, we will get there without juggling around with half a dozen of different plugins.
All right then, here’s the raw mix:
The basic sound of the drums is okay, but it just doesn’t seem to cut through the mix. The snare drum in particular is somewhat buried by the hihat – yet not much longer!
All for One
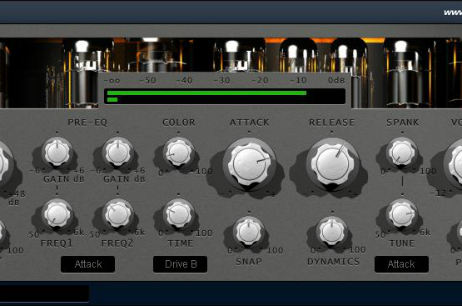
It starts with the big GAIN dial on the left. We turn it up until we get between three and five dB of gain reduction (indicated by the yellow line between the green input level meter in the middle display). Then we head over to the PRE-EQ. Since we’re dealing with a lot of different sounds (i.e. several single hits with varying attack and decay stages) it will be a good idea to choose the STATIC mode from the drop down menu below. We dial in a small boost at around 2.9kHz for FREQ1 and a slightly stronger dip at 6kHz for FREQ2 – this will bring the important parts of the signal out while also rounding off the tone.
Next we set up the coloration. For the general sound is quite bright already we turn the COLOR control down. We do the same with the TIME knob, because we will use the compressor stage to bring out the transients afterwards. Eventually, we choose the Sat A saturation algorithm which will beef up the overall sound nicely.
Now for the compressor. First, we crank up the ATTACK to its maximum to make sure we don’t squash the attack stages of the drums. For the same reason we turn up the Snap control all the way up. The Release parameter is crucial here: if it’s too high the tails of the drums (especially that of the hihat) will be too dominant; if it’s too low we will get a sound that is kind of chopped up, almost like a gate (which can be an interesting effect in its own right, though). So we need to tailor it exactly to our specific recording. If we focus on the hihat and listen to when it sounds right. Finally, we set DYNAMICS to maximum.
Before we finish we ensure that we lower the (output) VOLUME to match levels with the dry signal.
The interface of the plugin should now look something like this: 
The Result
And now it’s up to you to make a decision! We are pretty sure, however, that you will enjoy the punchier and more powerful result as much as we do 😉
You can download the preset for Grasso here: Grasso Metal Drums Preset.FXP